Gridding with Plate
There's a number of ways Origin's on-board gridding feature can be employed with Plate. Once a workspace has been made place a grid to the center of the cut window or otherwise oriented to marks or workpiece. Some details about gridding while using Plate:
Creating grids
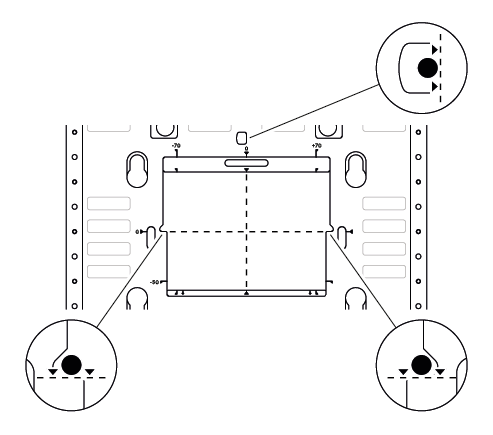
Gridding on Plate can use special probe points that will always place the grid oriented to the center of the cut window. To read more about basics of Gridding or even more complex techniques, consult our articles on Creating a Grid and Gridding Techniques.
Be sure to use the shank of the engraving bit as the probe. This will ensure that the best objective edge is being referenced when probing.
Don't push against the tool when probing--resting the tool against the point will give the most accurate result.
Using the Probe Points

Plate’s cut window includes 3 probe points. Use Origin to probe the points in order to create a Grid at the center of Plate’s cut window.
Make sure the grid probes are oriented properly. The X probes should be oriented to the bottom of the probe. The Y point should be oriented to the right.
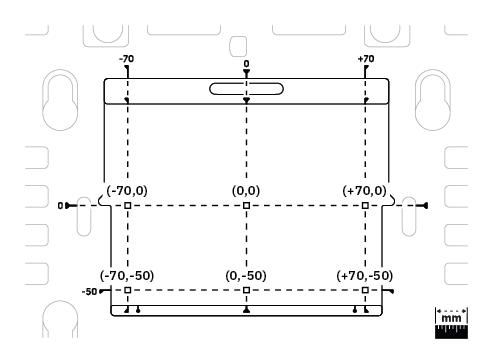
Once the Grid is setup specify X/Y increments and use the six reference points to place the desired design. We recommend using increments of 10mm because Plate's window is designed to multiples of 10mm.
These points will provide enough clearance between the cut and the edge of the window to perform an outside cut if needed:

Probing the workpiece

To grid off the workpiece make sure there's clearance for the bit between the edge of the workpiece and the edge of the window. This can be done with the graphical reference points on Plate.
Once Plate is comfortably attached to the workpiece perform a standard grid operation to the edge or to marks drawn on the workpiece.